
WHO IS SENTINEL, AND WHY DOES IT MATTER NOW
Season 2 dropped a new shell into the roster, and the community has been working out what to make of it. The SentinelCombat is a combat-class anchor — not the fragile, repositioning type you see in VandalCombat or AssassinStealth, but something closer to a living fortification. If you have been asking whether Sentinel is worth your time, this guide gives you an honest answer and the practical knowledge to run it well from the first drop.
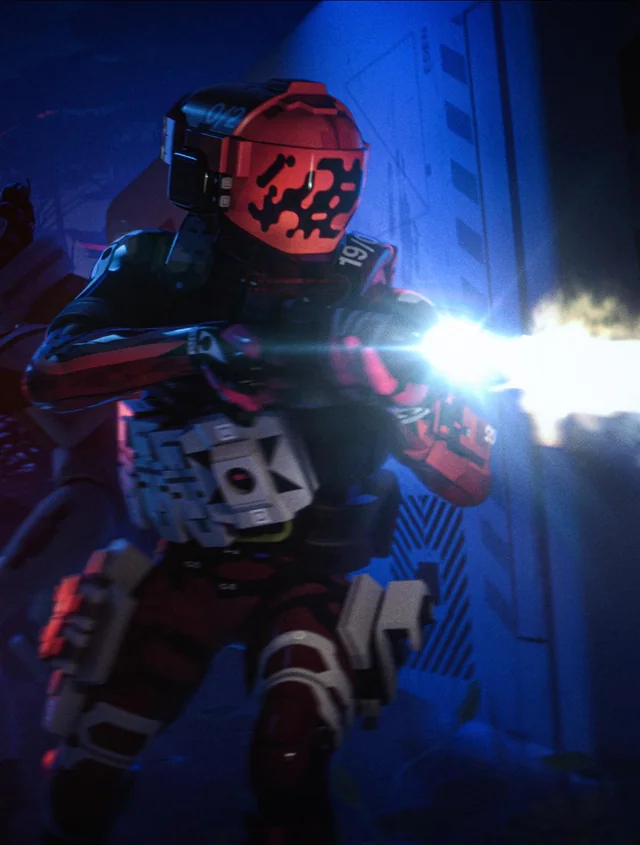


The short version: Sentinel rewards Runners who think about space control before they think about kills. If that framing sounds familiar, it should — it is the same discipline that makes a good DestroyerCombat, but with an emphasis on intel and reaction over raw aggression.

THE KIT, BROKEN DOWN
Sentinel's four-part ability set defines a very specific role.
The Prime ability is the Defender System — a deployable platform that intercepts incoming grenades and explosives, neutralizing them harmlessly. While you and nearby allies stand near it, you gain increased weapon stability and reload speed. It has a finite number of projectiles it can intercept, so placement is everything. Put it down in the corner of a room you plan to hold, not in open ground. Once the interception charges are spent, it is furniture.
The Tactical is Snare Mine — a proximity mine that detonates into immobilizing submunitions. This is your peel tool and your ambush setter. Drop it behind you when you rotate, tuck it inside a doorframe before you peek, or use it to punish enemies chasing after a trade. Immobilized targets are not just slowed — they are free kills for a teammate who is watching.
Two Traits complete the picture. Prey Tracker activates motion tracking in your HUD, painting moving enemies on radar within a conical forward zone. This is passive, always-on intel — you do not have to activate anything. In tight corridors or multi-level architecture like Outpost's Pinwheel, knowing a Runner is moving toward you before you hear them is a decisive edge.
Castle Doctrine
is the second Trait and it is why Sentinel wants SMGs, Pistols, and Shotguns in the primary or secondary slot. Your ready and reload speed on those weapon classes scales with the number of nearby hostiles. More pressure on you means faster hands — the shell literally rewards being rushed. When you take splash damage, your Hardware, Firewall, and Self-Repair Speed also spike for a short window. Sentinel punishes grenade spam twice: the Defender System eats the grenades, and Castle Doctrine turns any splash that gets through into a temporary survivability boost.
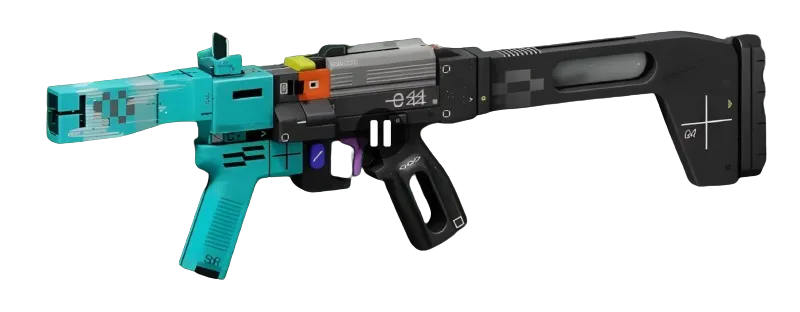
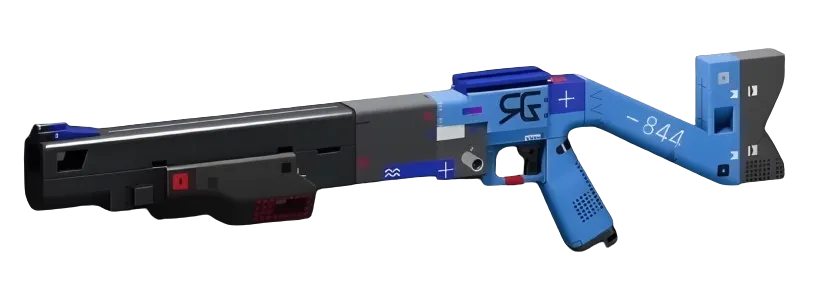
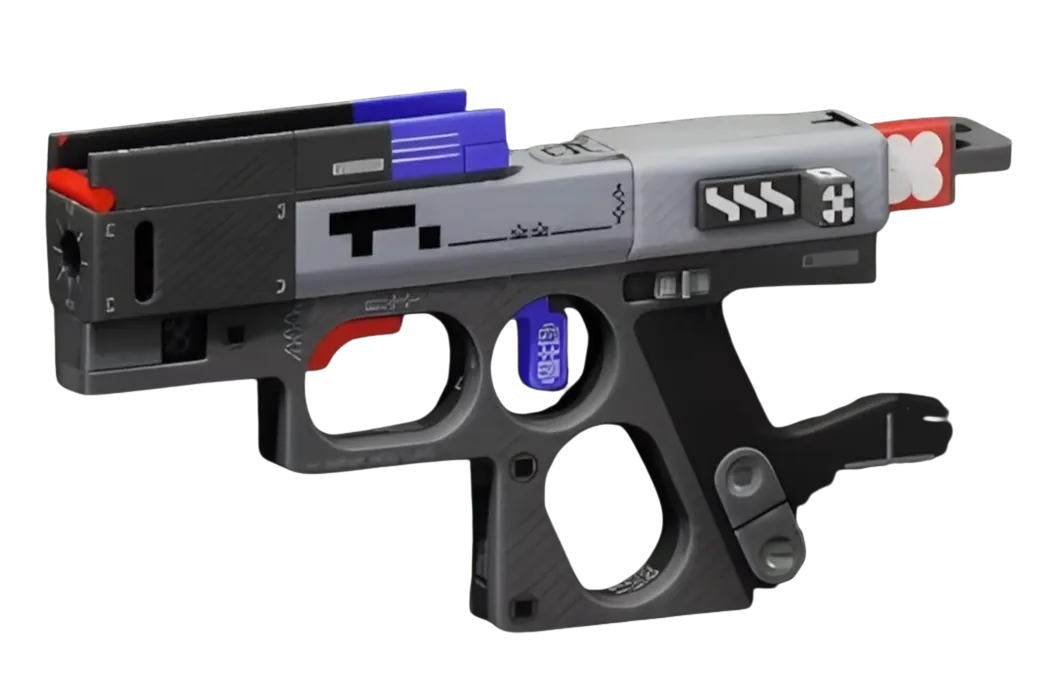
WHICH WEAPONS FIT CASTLE DOCTRINE
Castle Doctrine names the weapon classes that benefit directly: SMGs, Pistols, and Shotguns. Work with that.
The **BRRT SMGSMG (11 damage, 1000 RPM, Light Rounds, CQB range) is the fastest-cycling option in the category and turns Castle Doctrine's reload bonus into a near-constant advantage in sustained close fights. The Misriah 2442Shotgun (11 damage, 72 RPM, MIPS, CQB) is the deliberate alternative — slower, harder-hitting per trigger pull, and brutal in the doorway choke points Sentinel is designed to anchor. The Magnum MCPistol** (41 damage, 138 RPM, Heavy Rounds, Mid range) gives you the pistol option with real stopping power for when a threat appears just outside CQB range.
For mods, **Slip ProtocolChip MODStandard (Superior Chip) pairs well with any of these — massive stability and accuracy bonus while moving, which lets you step-and-shoot without giving up accuracy. Blue Blood** (Superior Chip) gives you a health restore on hostile Runner downs, which matters on a shell that wants to stay planted and absorb pressure rather than reset position.
CRADLE PATH: WHAT TO BUILD FIRST
Sentinel is a staying-power shell, and the Cradle tracks that support that are Endurance and Resistance.
Start with Endurance. The Quick Vent perk at 3 Energy means heat recovery kicks in faster after any heat-generating action — critical when you are holding ground under sustained fire. Push to Heat Dissipation at 9 Energy for accelerated heat recovery overall. You do not need to reach Heat Purge immediately; get Quick Vent and move to Resistance next.
In the Resistance track, Scab Factory at 3 Energy slows your bleed-out when downed. On a shell that will take hits in controlled engagements, surviving to be revived matters. TCIV Resist at 8 Energy reduces damage from environmental hazards — relevant anywhere you are anchoring positions near Lockdown events or Night Marsh's environmental pressure.
Respec is free. Start with 3 into Endurance, 3 into Resistance, and evaluate from there. The /cradle planner lets you map the full breakpoint path before you commit.
RANKED ROLE AND SQUAD SYNERGY
Sentinel is not rated in the verified shell data yet — it is new, and early assessments are still forming. What the kit tells us is clear enough: this shell is a squad anchor, not a solo carry. The Defender System creates a safe zone for a TriageSupport to work inside. Snare Mine turns rotations punishing for anyone chasing your Destroyer or Vandal. Prey Tracker feeds your ReconIntel-less squads passive positional intel.


Solo ranked is a harder pitch. You have no one to hand the Defender System's stability bonus to, and Snare Mine's value is highest when a teammate can capitalize on the immobilization. Run RookFlex before Sentinel if you are learning the game solo — Rook's kit is more forgiving on an uncoordinated team.

TAKEAWAYS
- Place the Defender System before the fight starts, not during it. Pre-positioning in a room you plan to hold is the difference between a tool and a dropped prop. - Prioritize SMGs, Pistols, or Shotguns to activate Castle Doctrine's reload bonus under pressure — the BRRT SMG and Misriah 2442 are your most direct options. - In the Cradle, open with 3 Energy into Endurance (Quick Vent) and 3 into Resistance (Scab Factory). Respec costs nothing, so test the path and adjust.

