
THIN SOURCE SIGNAL THIS CYCLE
Both videos in the queue this cycle are about Bungie leadership and studio news — neither contains build content. There is no gameplay footage, loadout breakdown, or gear discussion to analyze from these sources. That's an honest signal worth naming: this cycle, the build theory comes from the database and the meta, not from a creator video. What follows is a ground-up construction, not a reaction piece.
THE ROOK PROBLEM — AND WHY IT'S ACTUALLY A DESIGN SPACE
RookFlex is the shell the community consistently underrates, and the coverage numbers back that up. The shell gets labeled a "beginner shell" and left behind once players unlock something flashier. That framing is mostly right — but it misses the one context where Rook's kit is genuinely competitive: solo extraction on Perimeter and Dire Marsh, where consistency beats spectacle.

The Rook's two abilities are Recuperation (slow health restoration when undamaged) and Signal Mask (a temporary holodisplay that makes UESC forces unaware of your presence). Neither ability wins a fight. Together, they reduce the number of fights you need to win. That is a fundamentally different win condition from every other shell in the roster, and building around it correctly changes how you think about gear selection entirely.
The win condition here is not "kill everything." It is "extract with gear intact by taking fewer trades than any other Runner on the map." Rook is the shell that says the best fight is the one that never happens.
THE LOADOUT
Primary weapon: the **Twin Tap HBRPrecision Rifle. At 22 damage and 600 RPM on a 20-round magazine of Heavy Rounds, it punishes the mid-range engagements Rook is forced into when Signal Mask gets disrupted by a sprint or a stray bullet. The Vigilant LensOptic MODEnhanced (Superior Optic, +0.09s ADS speed, -0.33 ADS spread) tightens the precision window without pushing the engagement range further than you want. The Hi-Speed Mag** (Superior, -0.52s reload, +3 magazine size) keeps the reload fast enough that you are never caught mid-animation after a two-tap.
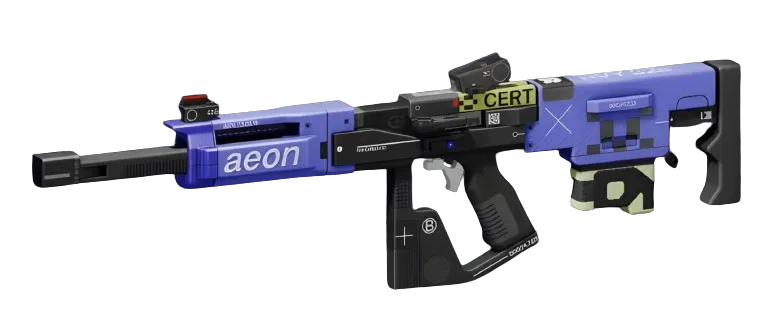
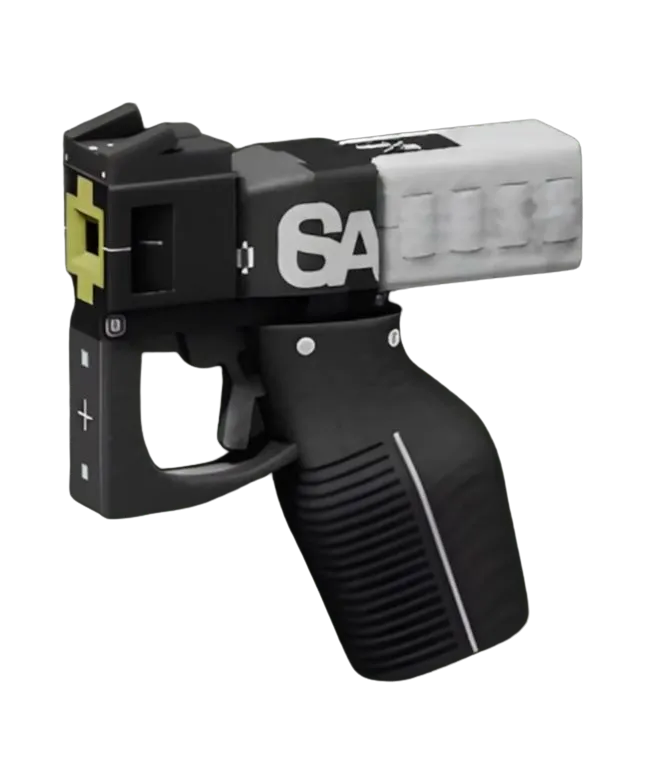
Secondary: the **CE Tactical SidearmPistol at 20 damage, 300 RPM, 18-round magazine. It is there for the moment Signal Mask breaks unexpectedly and someone closes distance on you. No exotic mod slot needed — a Stack OverflowChip MODDeluxe (Standard)** chip on the sidearm gives you an overflow buffer on an emergency empty reload, a small edge that costs nothing.
Chip mod on the Twin Tap HBR: Testament (Superior). ADS for a short duration, and range plus aim assist increase. This is the interaction the build is built around — Rook plays slow and deliberate, which means you are spending more time ADS-ing anyway. Testament rewards the patience that Signal Mask teaches you.
IMPLANTS AND CRADLE
Implant slots: **Regen V4HeadSuperior (Head, Superior) for the Self-Repair Speed boost and Revive Speed — Rook's Recuperation passive and Regen V4 stack toward the same outcome, getting you back to full faster in the quiet moments between contacts. Solid Stance V4LegsSuperior (Legs, Superior) for the Hardware and Heat Capacity bump — Rook accumulates heat slowly compared to movement shells, and the Heat Capacity buffer keeps that passive stable. Survival Kit V4TorsoSuperior** (Torso, Superior) for the Ping Duration extension and Firewall — knowing where enemies are before they find you is Signal Mask's best friend.
Cradle: since respec is free, dial this in without hesitation. The priority path is Resistance to the Scab Factory breakpoint [UNVERIFIED - exact Energy cost unconfirmed] for slower bleed-out when downed solo, then Recharge toward the Head Start breakpoint [UNVERIFIED] so Signal Mask has partial charge on infil — getting that first rotation done under UESC-blind conditions is what sets the run's pace. If you have remaining Energy, Endurance toward Quick Vent [UNVERIFIED] smooths out the rare moments you do sprint aggressively. Map this path at /cradle to see exactly where each perk lights up.
RANKED VIABILITY AND THE HONEST CEILING
Rook is rated Solo B / Squad Unknown in the shell database — and that B is real, not inflated. In solo ranked, the Signal Mask-into-Recuperation loop lets you ghost UESC contacts, rotate to contested Holotag zones without broadcasting your position, and heal out before re-engaging Runners. You are not hunting Holotags; you are outlasting the hunters and picking the tag up after the dust settles.
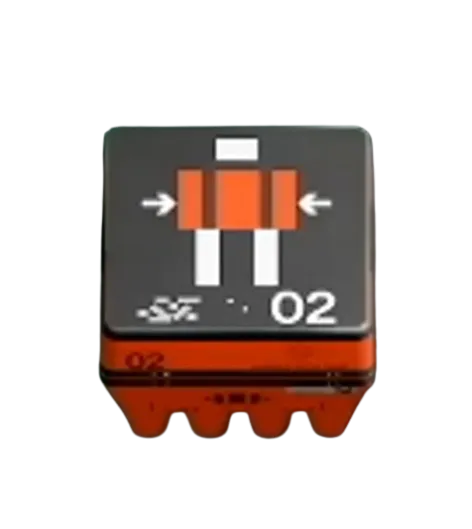
The ceiling: Rook does not close. If a ThiefStealth or AssassinStealth runs you down with a grapple or a smoke dive, you have no escape tool and no burst heal. The two percent I would chase here is a **Ghillie Suit ChipChip MODSuperior (Superior)** on the Twin Tap HBR swapped in over Testament on maps with heavy vegetation cover — crouching for a short duration grants increased stability, range, and accuracy, and Rook crouches a lot. Whether that swap is worth the loss of Testament's sustained ADS bonus depends on your play pattern. For most players running this build, Testament is the safer default. The Ghillie swap is a map-read, not a constant.


Point your faction reputation toward the /factions page for full Armory progression — some implant tiers that support this build require faction standing to unlock, and the exact costs vary by what's in rotation.


