
WHAT ROOK ACTUALLY IS IN RANKED SOLO
RookFlex sits at B-tier in ranked solo. That is an honest grade for a shell that trades specialist firepower for durability and flexibility — 140 HP and 35 shields give you the second-highest raw health pool in the game, and Adaptive Frame means you pay almost nothing to swap between weapon types mid-engagement. This is not an S-tier solo carry shell. It is a shell that lets you survive long enough to make good decisions, and that matters more than most climbers admit.

The win condition here is simple: outlast the first exchange, reposition, and close on your terms. Rook does not win on burst or stealth. It wins on attrition.
THE BUILD
Primary: M77 Assault RifleAR. Sources list it at 16 damage per round at 450 RPM with a 24-round magazine — the flex range profile makes it workable from mid to close without requiring a swap. This is the load-bearing choice. Adaptive Frame reduces the penalty when you do swap, but the M77's range band means you are initiating fewer awkward weapon transitions in the first place.
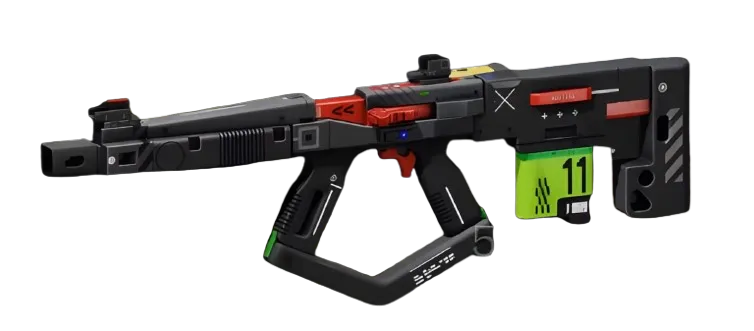
Recommended mods: Interval Mag (Prestige) for the confirmed range and reload speed gains — the ads_spread reduction of 0.14 and aim assist bump directly tighten your mid-range consistency, which is where Rook's fight tempo lives. Pair it with Farshot BarrelBarrel MODDeluxe (Superior) for an additional +45 range and -0.2 ADS spread if you are running longer sightlines. If the Interval Mag is not accessible, Hi-Speed Mag (Superior) keeps your reload fast — confirmed at -0.52 seconds reload speed — and avoids the downtime that will get you killed post-trade.
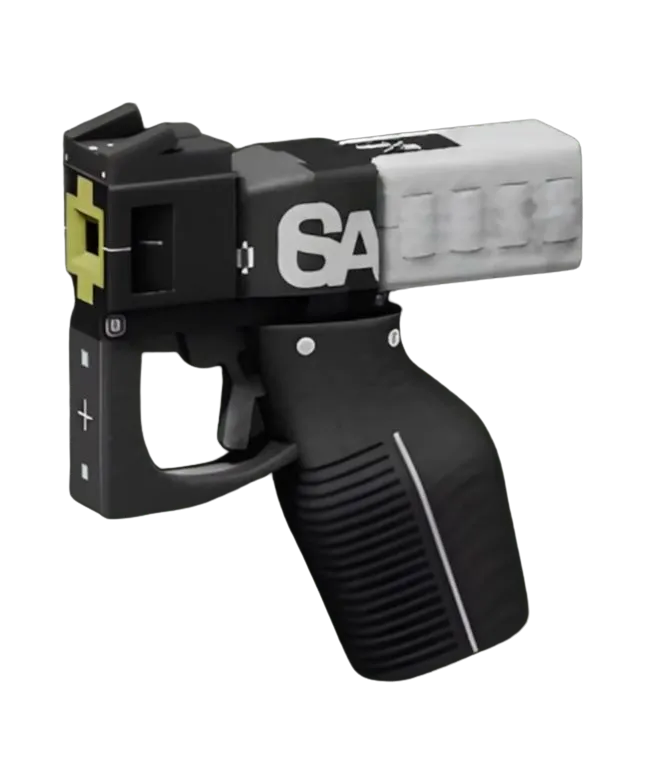
Secondary: CE Tactical SidearmPistol. 20 damage, 300 RPM, 18-round magazine. Confirmed numbers. It does not win gunfights on its own, but it handles the pivot when your primary goes empty at the worst moment, and with Adaptive Frame the swap speed penalty is minimal. This is the answer to the question "what happens if I have to reload in a Runner's face."
Implant stack: Regen V4HeadSuperior in the Head slot — 50% Self-Repair Speed and 20% Revive Speed. Rook's health advantage only compounds if you are actually recovering it between engagements. Survival Kit V4TorsoSuperior in the Torso slot adds Ping Duration and a Heat Capacity bonus, keeping you operational longer in sustained heat-generating sequences.
Cradle priority: Endurance track first. The "Quick Vent" perk (reported at 3 Energy) and "Heat Dissipation" (reported at 9 Energy) both address the one mechanical choke point this build faces — prolonged engagements generate heat, and Rook does not have a movement ability that dumps heat on command the way VandalCombat does. Getting heat recovery moving faster is what keeps the attrition game running. Recharge track second if you have Energy to spare — "Head Start" (reported at 4 Energy) gives you partial Tactical charge on infil, which matters when you need Signal Mask for a safe first rotation.

RANKED CLIMB NOTES
Signal Mask is underrated for Holotag hunting in solo ranked. UESC forces ignoring you is a free scouting window — use it to read the POI before committing. Do not sprint into it and break the mask early.
Rook does not want to be the aggressor against AssassinStealth or ThiefStealth in a clean 1v1. Both shells have better tools for the initial exchange. Your edge is that you survive the opener they expected to end it. If you are still standing after their first combo, you are probably winning the second phase.


Pair this build's health advantage with disciplined positioning — Rook forgives mistakes, it does not reward recklessness.


