
THIN SOURCE NOTICE
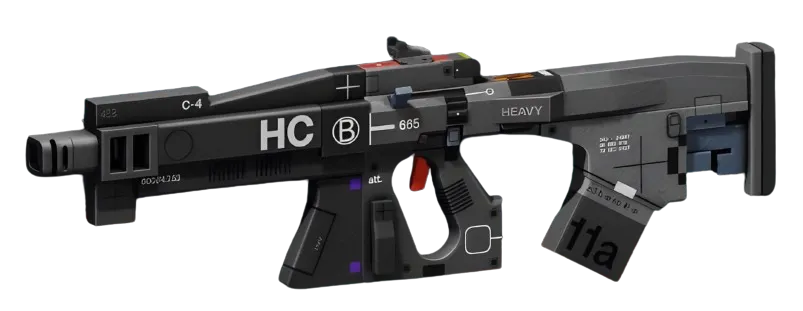
One video surfaced this cycle, and it has nothing to do with builds — it's a commentary piece on studio culture. There is no build content to extract from it. Rather than pad around a null signal, I'm using this cycle to address a shell that's been underserved by the community and by this site: the RookFlex. If you've been waiting for a proper S2 breakdown of Marathon's most self-sufficient shell, here it is.

THE WIN CONDITION
Rook's game is simple to state and difficult to execute: stay alive longer than everyone else, loot more than everyone else, and extract with it. The shell's kit — Recuperation as its Prime, Signal Mask as its Tactical — is built around one core loop. Signal Mask lets you ghost UESC combatants entirely while you loot, letting you operate without spending ammo or taking chip damage. Recuperation slowly restores health when you're not being shot. Together, they create a run structure where you spend less time managing damage and more time accumulating loot. The win condition is clean extraction with a heavy pack, not a high kill count.
The shell is [UNVERIFIED] for exact HP and shield values, but sources list it at 140 HP and 35 shield — a middle-of-the-road defensive profile that makes the self-sustaining loop non-negotiable. You are not tanking through fights. You are avoiding them, recovering from the ones you can't, and leaving.
WEAPON AND MOD SETUP
The primary job of your weapons on Rook is quiet, efficient clearing when Signal Mask gets disrupted — sprinting breaks it, so you will sometimes get caught. You want a weapon that closes engagements fast before your UESC aggro compounds.
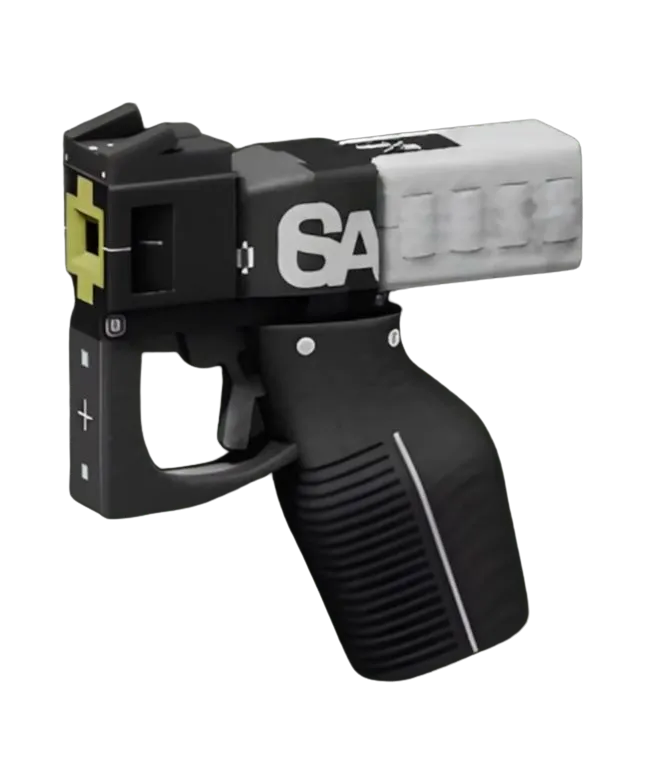
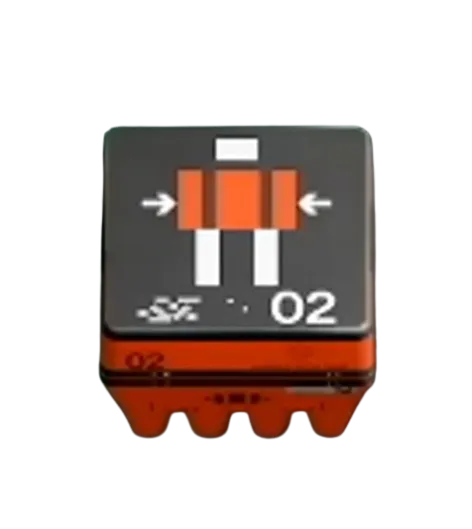
The Impact HARAR at 24 damage and 400 RPM gives you a reliable damage-per-second number at mid-range without burning through Light Rounds reserves. Slot the Hi-Speed Mag (Superior) — the reload speed reduction keeps you back in the fight fast if a fight spills longer than intended. For a chip, See Ya (Superior) is the natural fit: empty-magazine reloads trigger a brief invisibility window, which buys you time to reposition or let Signal Mask reactivate. The interaction between See Ya's cloak window and Rook's already stealth-leaning playstyle is not subtle — it is the whole point.
Secondary: the CE Tactical SidearmPistol at 20 damage and 300 RPM handles close encounters efficiently and is a Light Rounds weapon, so it shares your primary ammo pool. No complicated logistics.
CRADLE ALLOCATION
Because respec is free, you can dial in the exact Cradle shape for this build and flip it back out to your combat spec with no penalty — worth saying plainly, because it lowers the barrier to committing.
Rook's biggest in-run vulnerability is heat. Signal Mask breaks on sprint, and sprinting generates heat. If your heat pool is shallow, you end up in a feedback loop: sprint to escape, overheat, can't sprint, get pinned. The Endurance track addresses this directly.
Take Endurance to the Quick Vent perk at 3 Energy — heat recovery begins more quickly after heat-generating actions [UNVERIFIED]. Push it to Heat Dissipation at 9 Energy for the faster overall heat recovery [UNVERIFIED]. That 9-Energy investment is the core of this build's survivability — it's the breakpoint where sprint-and-mask becomes a real rhythm rather than a liability.
With remaining Energy, put points into Recharge. The Head Start perk at 4 Energy starts your runs with partial Tactical charge [UNVERIFIED], meaning Signal Mask is available almost immediately on infil — critical for early-run looting before you have a defensive read on the lobby. Map out the exact path at /cradle before you commit.
IMPLANT CHOICES
Head: Regen V2HeadEnhanced (Enhanced) gives +30% Self-Repair Speed and +10% Revive Speed. Since Recuperation already restores health (though interrupted by damage), pairing it with a faster self-repair rate means both your active recovery and your passive healing are on an accelerated timeline.
Legs: Distance Runner V1LegsStandard (Standard) adds Heat Capacity, which stacks with the Endurance Cradle investment to make your heat ceiling meaningfully higher — more sprint duration before Signal Mask goes down.
Torso: Survival Kit V1TorsoStandard (Standard) fills the slot cleanly for a solo runner without sacrificing a stat you actually need.
VERDICT: ROOK AS A SOLO QUEUE ANSWER
The shell's ranked profile is listed at B-tier solo — not the flashy S-tier of ThiefStealth or the Holotag-hunting aggression of AssassinStealth, but honest. What Rook offers that nothing else does is a near-zero-friction looting experience against UESC. For Perimeter, where the lobby density is highest and the loot is consistent, Rook with Signal Mask can ghost entire POI clears. The shell rewards players who extract correctly and punishes those who lean into the combat profile it doesn't have. Build the Endurance base, keep your ammo clean, and let the extraction do the talking.


