
Starting Marathon as a solo player feels overwhelming, but your first week sets the foundation for everything that follows. Here's your structured path from landing to your first successful extractions.
Shell Selection for Solo Success
Start with RookScavenger — it's designed for learning Marathon's core systems. With 140 HP and 35 shield, Rook forgives positioning mistakes while you master heat management and weapon swapping. The Adaptive Frame passive reduces penalties when switching between weapon types, letting you experiment with different loadouts.

Once comfortable, transition to VandalCombat for ranked play. Vandal's Combat Flow passive grants movement speed after kills, and the Micro Jets trait provides crucial vertical escape options. At 150 HP and medium-fast speed, Vandal strikes the perfect balance between survivability and mobility for solo players.

Avoid AssassinStealth and ThiefStealth initially — their low HP pools (100 and 90 respectively) punish new players who haven't mastered positioning and heat management.


Essential First Week Loadouts
Your starter loadout should prioritize reliability over damage. Equip the M77 Assault RifleAR with any available Steady BarrelBarrel MODSuperior mod for improved stability and ready speed. The M77's 16 damage at 450 RPM provides consistent mid-range performance across all map types.
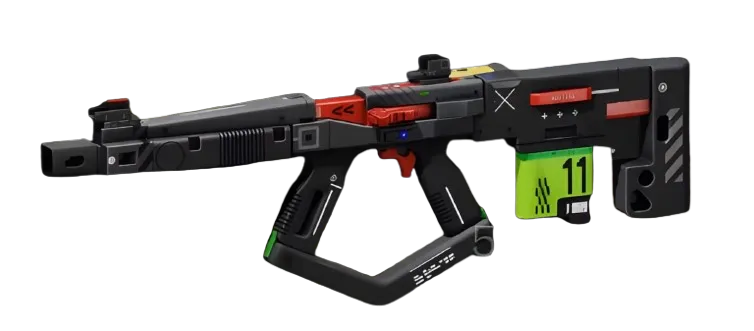
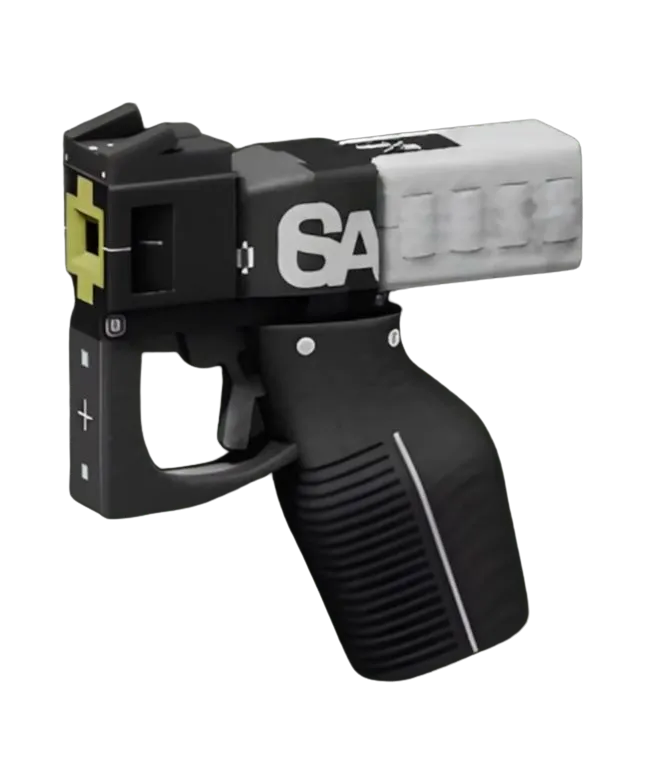
For secondary, grab the CE Tactical SidearmPistol. Its 20 damage per shot handles cleanup kills and emergency situations when your primary overheats. Add a Reflex SightOptic MODEnhanced if available for faster target acquisition.
Implant priority: Focus on Torso slot upgrades first. Even a Standard Survival Kit V1TorsoStandard provides valuable ping duration and loot speed bonuses that directly impact your extraction success rate.
Faction Strategy for Week One
Choose CyberacmeFaction as your primary faction — their early unlocks directly support solo survival. Target these specific upgrades:

Scavenger.exe (Rank 1, 750 CR): +20 Loot Speed reduces time spent vulnerable while looting Heat Sink.exe (Rank 1, 2,500 CR, 12 Unstable Biomass): +20 Heat Capacity prevents weapon overheating during extended fights Firm Stance.exe (Rank 1, 750 CR): +20 Fall Resistance reduces damage from failed movement attempts
These three upgrades transform your early game survivability while requiring minimal resource investment.
Heat Management Fundamentals
Heat buildup kills more solo players than enemy fire. Each weapon generates heat when fired — overheating locks you into a vulnerable animation. Learn these critical thresholds:
M77 Assault Rifle: 15-shot burst maximum before cooldown BRRT SMGSMG: 8-shot burst maximum CE Tactical Sidearm: 6-shot burst maximum
Practice burst firing in the shooting range. Count your shots aloud until muscle memory develops. Weapon swapping resets heat buildup — use this technique during longer engagements.
Extraction Priority System
Successful extractions matter more than high-value loot during your first week. Follow this priority system:
1. Secure basic consumables (health/shield items) 2. Loot faction materials for upgrades 3. Extract immediately when carrying 3+ valuable items 4. Avoid contested extraction sites — choose mobility over greed
Track extraction site timers constantly. Most solo deaths occur during rushed extractions when players attempt last-minute looting.
Combat Engagement Rules
As a solo player, every fight is a 1v3 disadvantage. Apply these engagement rules:
Engage only when enemies are isolated or distracted Use vertical positioning — most teams struggle with elevation changes Prioritize escape routes before shooting Never chase kills — elimination feeds rarely justify the risk
Your goal is survival and extraction, not elimination counts. High-skill solo players win through smart positioning and tactical retreats, not raw aim duels.
Key Takeaways
Start with Rook, transition to Vandal. Level CyberAcme first for survival upgrades. Master heat management through burst firing and weapon swapping. Prioritize extractions over elimination chasing — your faction progression depends on consistent material gathering, not flashy plays.
The panel weighs in
1 TAKE ◇ GhostCommunity93d agoSolo players are the backbone of any extraction shooter community, and this structured approach to the first week is exactly what new Runners need. The emphasis on Rook as a learning shell shows understanding that community growth happens when players can actually survive long enough to engage with the core systems. This kind of accessible onboarding content helps build the player base that keeps lobbies populated and the community thriving.
