
THE POST-PATCH ROOK ADVANTAGE
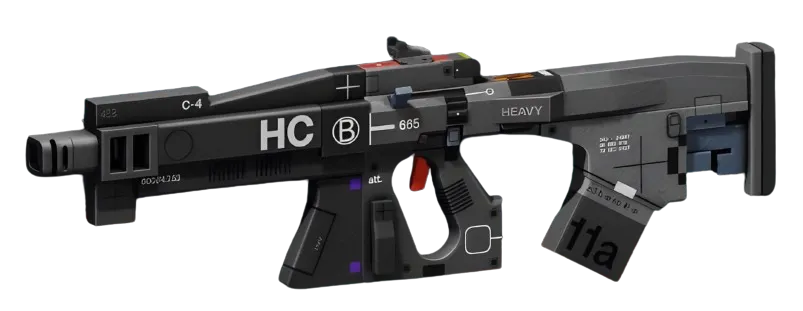
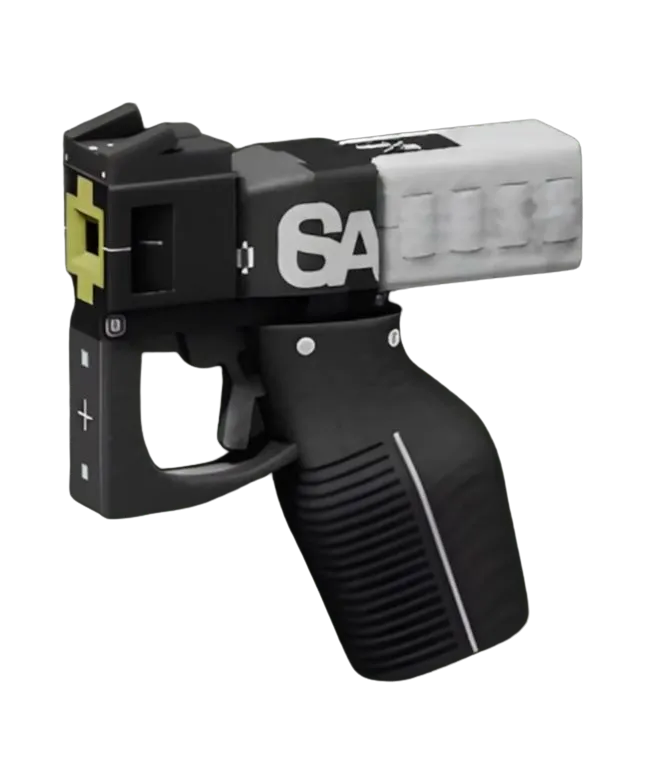
Season 2's weapon balance changes hit the ranked meta hard, but RookFlex emerged stronger than expected. While other shells scramble to adapt to the new damage values, Rook's Adaptive Frame passive eliminates weapon-swap penalties — the exact advantage you need when the meta is this unstable. The optimal Rook solo build for Season 2 centers on Impact HARAR as primary with CE Tactical SidearmPistol secondary, designed to control mid-range engagements while maintaining close-quarters escape options.

This build capitalizes on Impact HAR's 24 damage per shot at 400 RPM — enough to challenge DestroyerCombat players at range without committing to the close-quarters fights they want. Rook's Overclock active synergizes perfectly with Impact HAR's 18-round magazine, turning reload speed into sustained pressure. When Holotag hunters push your position, swap to CE Tactical Sidearm with zero penalty and maintain damage output through the transition.

CORE LOADOUT BREAKDOWN
Primary: Impact HAR with Pinpoint BarrelBarrel MODSuperior (Superior) and Hi-Velocity PayloadMagazine MODSuperior (Superior). Pinpoint Barrel maximizes the weapon's natural 24-damage advantage at mid-range, while Hi-Velocity Payload solves the magazine capacity issue that normally limits Impact HAR in ranked play. This combination creates a 24-round magazine that reloads faster than stock — essential for winning extended Holotag fights.
Secondary: CE Tactical Sidearm with Steady BarrelBarrel MODSuperior (Superior). The 20-damage, 300 RPM sidearm covers your close-range gaps when Impact HAR isn't optimal. Steady Barrel adds stability and ready speed, making the weapon-swap combo with Adaptive Frame nearly instant.
Implants: Hurting Hands V4TorsoSuperior (Superior) in torso slot for Firewall +20, Prime Recovery +10%, and Finisher Siphon +50. Regen V4HeadSuperior (Superior) in head slot for Self-Repair Speed +50% and Revive Speed +20%. These implants maximize your ability to outlast other solo players in ranked, turning Rook's natural durability into a grinding advantage.
WIN CONDITION AND RANKED APPLICATION
This build wins by controlling engagement range and outlasting opponents through superior sustain. Impact HAR forces fights at 30-40 meters where Destroyer players struggle and AssassinStealth players can't close distance safely. When enemies push close, Adaptive Frame lets you swap to CE Tactical Sidearm without the penalty that gets other shells killed mid-transition.

The win condition is methodical: use Impact HAR to chunk enemy shields at range, force them into cover, then use Rook's 140 HP and superior implant sustain to win the health trade. Against ThiefStealth players, the current S-tier solo threat, this build excels because Thief's 90 HP can't survive Impact HAR's damage output at mid-range encounters.

For Holotag play specifically, this loadout shines in defensive scenarios. When you're holding a Holotag and other players converge, Impact HAR's 24-damage shots create immediate pressure that forces attackers to respect your position. Overclock activates during the crucial reload windows, maintaining sustained fire when multiple enemies are pushing your location.
The build struggles against coordinated squad play but dominates the chaotic solo queue environment where positioning and weapon-swap speed determine most fights. In Season 2's current meta, that's exactly what Rook players need to climb consistently.


