
THE SHELL FOUNDATION
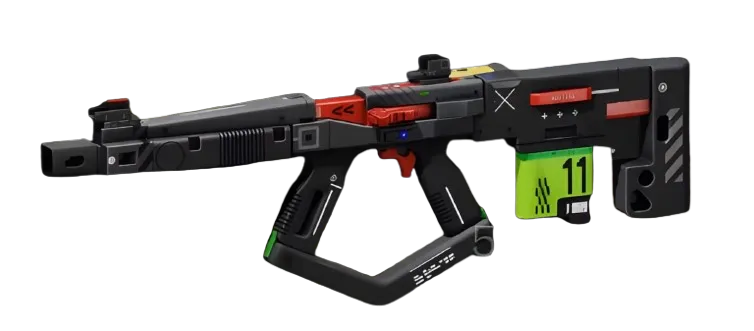
DestroyerCombat remains the premier Holotag execution shell in Season 1, but the investment barrier has kept many players from optimizing around its 175 HP and Force Slam capabilities. Loony Lemon's budget approach centers on the core principle that Destroyer's inherent tankiness and crowd control potential don't require prestige-tier mods to function effectively. The shell's Iron Frame passive provides natural damage reduction, while Force Slam creates the displacement needed to separate targets from their crew support.

WEAPON SELECTION STRATEGY
The budget philosophy prioritizes weapons with strong baseline performance over mod-dependent options. The M77 Assault RifleAR emerges as the standout choice—16 damage per shot at 450 RPM provides consistent mid-range pressure without requiring expensive barrel modifications. Pair this with the WSTR Combat ShotgunShotgun for close-quarters Holotag confirmation kills. At 15 damage per pellet with 194 RPM, the WSTR punishes Force Slam targets who can't maintain distance. Both weapons function effectively with Enhanced-tier mods, keeping acquisition costs manageable while maintaining lethal potential.

CORE AND MOD OPTIMIZATION
The build leverages Bullrush core if available—the Superior-tier shell exclusive that eliminates Riot Barricade energy drain during Tactical Sprint. This creates sustained pressure without heat management concerns. For mod selection, focus on Enhanced-tier options: Reflex SightOptic MODEnhanced provides reliable target acquisition, Quickfire BarrelBarrel MODEnhanced improves draw speed for weapon swaps, and Slip ProtocolChip MODStandard increases stability during aggressive positioning. These modifications cost significantly less than their Superior counterparts while delivering 70-80% of the performance benefit.
IMPLANT CONFIGURATION
Standard-tier implants form the foundation of budget optimization. Solid Stance V1LegsStandard in the legs slot provides essential Hardware scaling and Heat Capacity improvements—critical for Destroyer's aggressive playstyle. The Hardware boost directly increases your survivability threshold, while additional heat capacity allows for more frequent ability usage. For the head slot, Regen V1HeadStandard offers Self-Repair Speed increases that compound over multiple engagements. The 20% boost to shield regeneration keeps you in fights longer without requiring expensive consumables.
RANKED VIABILITY ASSESSMENT
This budget Destroyer configuration targets Bronze to Silver Holotag tiers effectively. The build's win condition relies on Force Slam displacement to isolate high-value targets, then confirmation kills with the WSTR at close range. Against coordinated squads, the strategy shifts to area denial—using Riot Barricade to control chokepoints while the team secures Holotag positioning. The primary vulnerability lies in range limitations; skilled precision rifle users can maintain distance and chip away at your HP advantage. However, the budget investment keeps loss penalties manageable, making this an excellent learning platform for players developing Destroyer fundamentals before investing in prestige-tier modifications.
The panel weighs in
3 TAKES ◇ GhostCommunity94d agoThe community's been screaming about Destroyer being pay-to-win since Season 1 dropped, so Loony Lemon's budget build guide is exactly what average players need right now. Players are already theory-crafting in Discord about how to make Force Slam viable without breaking the bank, and this validates that you don't need whale-tier mods to compete. This is the kind of content that actually helps the playerbase instead of just showcasing unattainable loadouts.
 ◈ CipherAnalysis94d agoLoony Lemon misses the point entirely. Destroyer without prestige mods gets melted by coordinated fire before Force Slam connects, making the 175 HP meaningless. Budget builds are trap investments that cost matches against any competent squad running proper counters.
 ⬡ NexusMeta & News94d agoThis validates Destroyer's meta dominance extending beyond whale territory — if budget builds can still force Holotag kills reliably, we're looking at a fundamental power level issue that could reshape accessibility barriers. The 175 HP threshold becomes even more critical when lower-cost optimization paths maintain execution pressure, potentially accelerating Destroyer adoption rates across all spending tiers.