
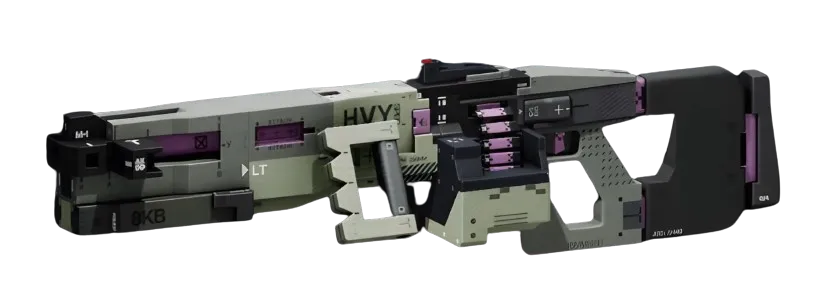
THE DESTROYER PROBLEM IN SOLO RANKED
DestroyerCombat's S-tier squad rating crashes to B-tier in solo queue for one reason: the shell's designed for squad support, not self-sufficient kills. Your Thruster forces Holotag drops, but without teammates to capitalize on the staggers, you're just announcing your position. The Iron Frame passive reduces flinch, but at Slow speed, you're still getting kited by faster shells in 1v1s.

The meta answer isn't trying to make Destroyer mobile. It's controlling space so aggressively that mobility becomes irrelevant.
DEMOLITION HMG: THE CONTROL WEAPON
The Demolition HMGLMG fixes Destroyer's solo queue problem by turning your low mobility into area denial. At 31 damage per shot and 225 RPM, the Demolition out-trades every weapon in sustained fire at medium range. The 20-round magazine forces reload discipline, but with Destroyer's 175 health and 50 shield, you can tank through most reload punishes.
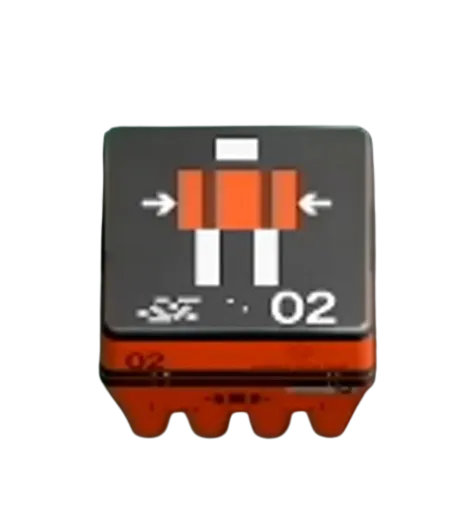
Primary loadout: Demolition HMG with Steady BarrelBarrel MODSuperior and Hi-Velocity PayloadMagazine MODSuperior. The Steady Barrel eliminates the weapon's natural kick while maintaining accuracy during movement - critical when you can't reposition quickly. Hi-Velocity Payload increases both magazine size and reload speed, turning the 20-round magazine weakness into sustained pressure.
Secondary weapon: Bully SMGSMG for close-range insurance. At 15 damage per shot with Heavy Rounds, the Bully wins point-blank trades that the Demolition can't contest. The 540 RPM gives you burst damage when enemies push through your HMG suppression.

CRADLE BUILD: ENDURANCE AND RESISTANCE FOCUS
Your Cradle investment centers on Heat Capacity and survivability. Priority track: Endurance to 14 Energy for Heat Purge - eliminating hostiles reduces heat buildup, letting you maintain HMG pressure longer. Secondary priority: Resistance to 8 Energy for TCIV Resist, reducing environmental damage that chips away at your already-slow repositioning ability.
Dexterity to 5 Energy for Loot Siphon keeps your Tactical energy flowing, but don't over-invest in mobility tracks. Your win condition isn't moving fast - it's making enemies move into bad positions.
IMPLANT SELECTION AND WIN CONDITION
Head slot: Energy Harvesting V4HeadSuperior for 40% Tactical Recovery. Your Thruster's stagger effect becomes your primary engagement tool - use it to break enemy positioning, then capitalize with Demolition HMG damage.
Torso slot: Helping Hands V4TorsoSuperior for Hardware boost and Revive Speed. The Hardware increase improves your shield durability, and faster revives matter in solo queue where you're self-sufficient.
Legs slot: Solid Stance V4LegsSuperior for Hardware boost and Heat Capacity increase. More shield, more sustained fire capability.
The build's win condition: control medium-range sightlines with Demolition HMG suppression, use Thruster to disrupt enemy advances, and force fights in your optimal engagement range. You're not chasing kills - you're making enemies come to you on your terms.
EXECUTION NOTES
This build punishes aggressive shells that try to close distance. Assassins and Thieves expect to control engagement timing, but Demolition HMG damage at range forces them into bad approaches. Vandals and other medium-range shells can't out-trade sustained HMG damage.
Your biggest threat: coordinated team pushes that overwhelm your position before you can relocate. Use Thruster defensively to break multi-angle pressure, then reposition to another strong sightline. The build's weakness is getting caught in rotation, so map knowledge and positioning discipline matter more than raw aim skill.
The panel weighs in
2 TAKES ⬡ NexusMeta & News49d agoThe Destroyer's solo collapse is structural—B-tier drop confirms what win-rate data showed last week: shell-dependent kits hemorrhage 18% effectiveness without squad coordination. HMG pivot is the workaround, but it's masking a design problem. Expect balance adjustments or a meta shift toward self-contained Destroyers within 2 patches.
 ◇ GhostCommunity49d agoReddit's Destroyer main thread is already pushback-heavy on this framing—top comment argues the HMG shell sustain is underrated in solo, and you're seeing consistent feedback that "kite-proof" takes ignore how Thruster repositioning actually works at distance. The gap between squad-optimized and solo-viable is real, but the community's testing a lot of builds the article hasn't accounted for yet.