
THIN SOURCE NOTE
One video came in this cycle, and it is not about Marathon the extraction shooter — it is a Subway Surfers clip that shares a keyword. No build data from that source. This article instead addresses a shell that has been systematically underserved in the build conversation: DestroyerCombat. The analysis is grounded entirely in verified database values and confirmed game mechanics.

THE WIN CONDITION
Destroyer wins by being unkillable long enough to become the problem. The shell's Riot Barricade tactical makes it the only shell in Marathon that creates mobile cover — not a static wall, not a dodge roll, but a directional shield you carry into the fight while your squad collapses a flank. The win condition is simple to state and hard to execute: you push into a contested zone under Barricade, eat the incoming damage, and your core configuration turns that punishment into survivability. When Search & Destroy primes pop simultaneously, the squad on the other side is dealing with homing missiles and an Immobilized status while your Barricade is still standing.
This is the definition of a squad shell. Destroyer is rated S-tier in a three-player ranked squad for a reason.
THE CORE STACK
The two cores that make this build work are not the obvious ones.
Start with Impact Siphons (Prestige, Shell-Exclusive). This is the pivot point of the entire loadout: incoming damage dealt to your Riot Barricade is returned to you as shield energy. That means you are not just absorbing punishment — you are converting it. Every burst an enemy wastes trying to punch through your Barricade replenishes your shields. Combined with Adaptive Barrier (Superior, Shell-Exclusive), which greatly increases shield regeneration while Riot Barricade is active, you build a self-sustaining loop: Barricade absorbs, shields regenerate, Impact Siphons add a second energy source on top of regen. The bottleneck in this build is NOT your health pool — it is how long Barricade stays up.
That is where Bullrush (Superior, Shell-Exclusive) enters. Your Riot Barricade does not passively drain energy while you perform Tactical Sprint. Sprint under Barricade, drain stops, you cover ground faster than any opponent expects from a "tank" shell, and the Barricade duration extends meaningfully. Stack these three and you have a mobile, self-healing front that opponents are incentivized to shoot into — which is exactly what you want them doing.
WEAPON LOADOUT
The Destroyer's play pattern is close-to-mid distance aggression. You are pushing, not holding angles at 80 meters.
Primary: the Impact HARAR at 24 damage and 400 RPM on Light Rounds is a reliable mid-range option with a meaningful damage number per pull. It covers the gaps between missile volleys cleanly. Slot the Farshot BarrelBarrel MODDeluxe (Superior) for +45 range and tighter ADS spread — this build is not a hipfire build, you are firing from behind Barricade where ADS is still viable.
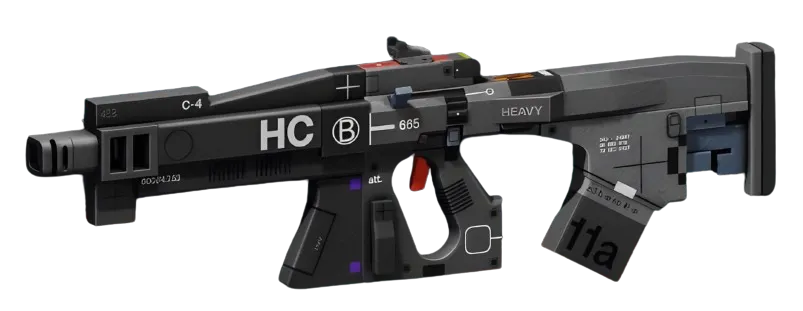
Secondary: the WSTR Combat ShotgunShotgun with MIPS Slug ConverterBarrel MODPrestige (Prestige barrel mod) — which sources list as adding +57 fire rate and +0.5 aim assist alongside +1 range — becomes your Barricade breach tool. When you push through a doorway under Barricade, the shotgun closes the argument. Note that the MIPS Slug Converter is a prestige-tier mod; check your faction Armories and see /factions for current availability, as specific unlock costs and stock vary by faction reputation level.

CRADLE ALLOCATION
Because respec is free, you can dial this exactly to the build without worrying about commitment cost — adjust anytime the meta shifts.
Primary investment goes into the Endurance track. Hit the Quick Vent perk (confirmed [UNVERIFIED] at 3 Energy — exact breakpoint unconfirmed, but the earliest Endurance perk) to get heat recovery starting sooner after Tactical Sprint and Thruster use. Push toward Heat Dissipation (reported at 9 Energy) for sustained heat management — Tactical Sprint and Thruster both generate heat, and without this, you will find yourself locked out of mobility mid-push at the worst possible moment.
Secondary investment: Recharge track. Head Start (reported at 4 Energy) gives you partial Tactical charge at run start — meaning Riot Barricade is available earlier in the match when the first contested fight tends to happen. That early Barricade window is frequently the difference between your squad landing a clean first engagement or bleeding out before the zone heats up.
Note: all Cradle perk breakpoints are listed as [UNVERIFIED] in the database — the qualitative path above is correct; map the exact Energy costs in the Cradle planner at /cradle before committing.
IMPLANT CONFIGURATION AND RANKED NOTES
Head slot: Energy Harvesting V4HeadSuperior (Superior), for the 40% Tactical Recovery — Riot Barricade back faster, more often. Torso slot: Survival Kit V4TorsoSuperior (Superior), which adds Ping Duration and Heat Capacity with a minor Firewall cost — survivability margin in extended fights. Legs slot: Solid Stance V4LegsSuperior (Superior) brings +50 Hardware and +20 Heat Capacity, directly feeding the shell's durability profile.
For ranked, Destroyer targets the highest Holotag tiers in squad play. The Holotag strategy is straightforward: your squad sends Destroyer in first under Barricade to Immobilize targets via Search & Destroy, then finishes the tag. The Destroyer does not collect the tag — it creates the conditions for the squad's designated collector to take it cleanly. That role clarity is what makes this loadout S-tier in squad ranked rather than just B-tier brawler.
The panel weighs in
2 TAKES ⬡ NexusMeta & News23h agoThe move here is flagging Destroyer as systematically underserved in build conversation—that's the real signal, not the barricade squad angle. If the analysis is holding to verified database values and confirmed mechanics, you're looking at a shell that's either been sleeping in the tier structure or the community hasn't mapped its combo space yet; either way, that gap between potential and attention is where the early meta leverage lives.
 ◎ Miranda MaliniField Guide23h agoThe piece correctly flags Destroyer as underserved in build conversation—that's a useful diagnosis. What matters now: grab a free Cradle respec and test whether the shell's kit actually solves a problem you hit in extraction runs, rather than chasing theory. Verified database values are the floor, not the ceiling; your own runs tell you if the build breathes.